1. Getting Started
We’re incredibly pleased and overwhelmed that you have chosen a theme from RadiantThemes for your website. We're sure you wont be disappointed! Here, we outline all types of the necessary information and provide you with all the essential details you require for using the theme. Our themes can only be used with WordPress and we presume that you already have WordPress installed and ready to go.
Essential Requirements and Recommended Settings--
Recommended Hosting
We recommend using a cPanel or Plesk based hosting from a renowned hosting service provider. Many low-cost providers provide their custom web-based panel which most of the time don’t have the required configuration to run websites smoothly.
We recommend using Siteground.com for any hosting related need. Order plain cPanel based hosting. Don’t order just WordPress Hosting from any hosting provider. WordPress hosting has lots of limitation and you might not be able to accomplish everything.
Ideally cPanel, Plesk driven control panels work seamlessly. Also, make sure that your provider uses the latest version of PHPMyAdmin. The older version of PHP and PHPMyAdmin might not support.
We can troubleshoot and help, if you use cPanel, Plesk, Webmin, web panel, zpanel types of control panel. Also, when you ask for our help, please consider sending control panel access. Only FTP access might not be sufficient always.
Recommended Hosting
To work with Softek, please ensure that you are running WordPress 5.0 or higher, PHP 5.6 or higher, and MySQL 5.6 or higher and wp_remote_get() function is unblocked in your server.
Recommended PHP Configuration Limits
Various issues that you may run into are: white screen, your demo import fails, empty page content and other similar issues that are all related to low PHP configuration limits. The best way is to increase the PHP limits of the hosting account.
2) Upload Max. Filesize — 128M
3) Max. Post Size — 128M
4) Max. Execution Time — 300
5) PHP Max. Input Vars — 2000
6) PHP Max. Input Time 1000
2. Theme Installation and Demo Import
1) Download the Softek theme by clicking on ‘All files & documentation’ of ‘Download’ button.
2) Login to your WordPress Admin Panel.
3) Click on Appearance -> Themes -> Add New.
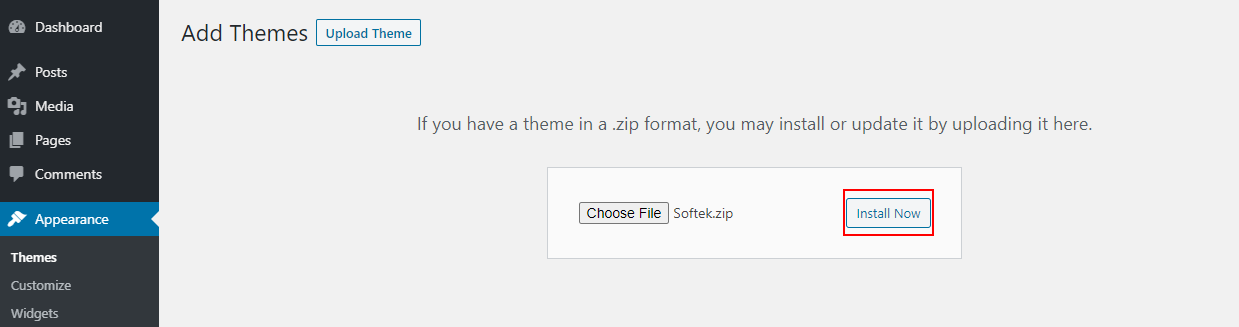
4) Click on Upload Theme and choose the theme zip 'Softek.zip file (Which you already got by downloading the full package) and click on 'Install Now' button.
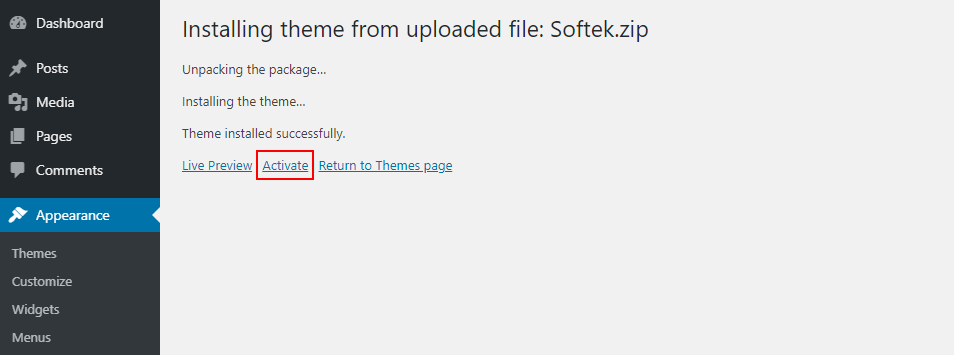
5) Activate the Softek theme.
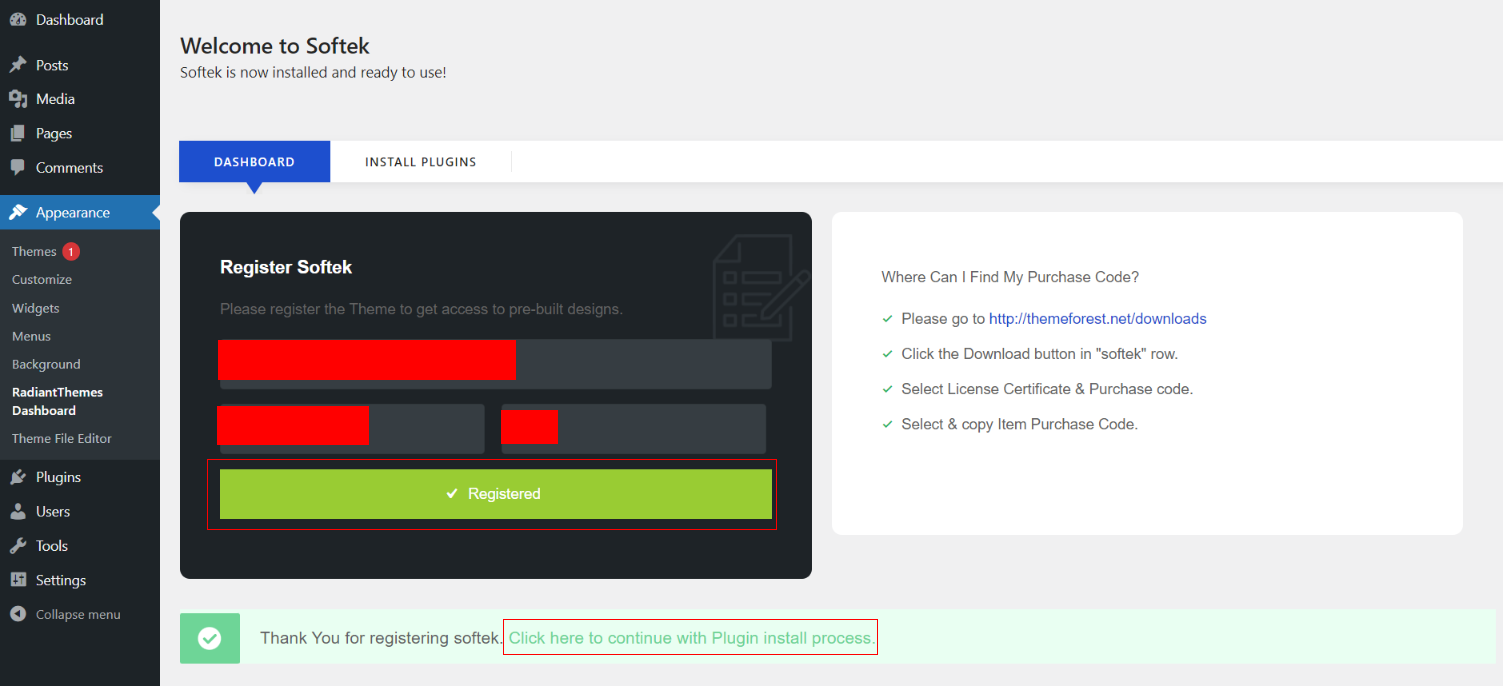
6) Register the theme with your Envato username, email id and purchase code.
Only one standard license is considered valid for one website since unning more than 1 website on a single license is a gross infringement or violation of license.
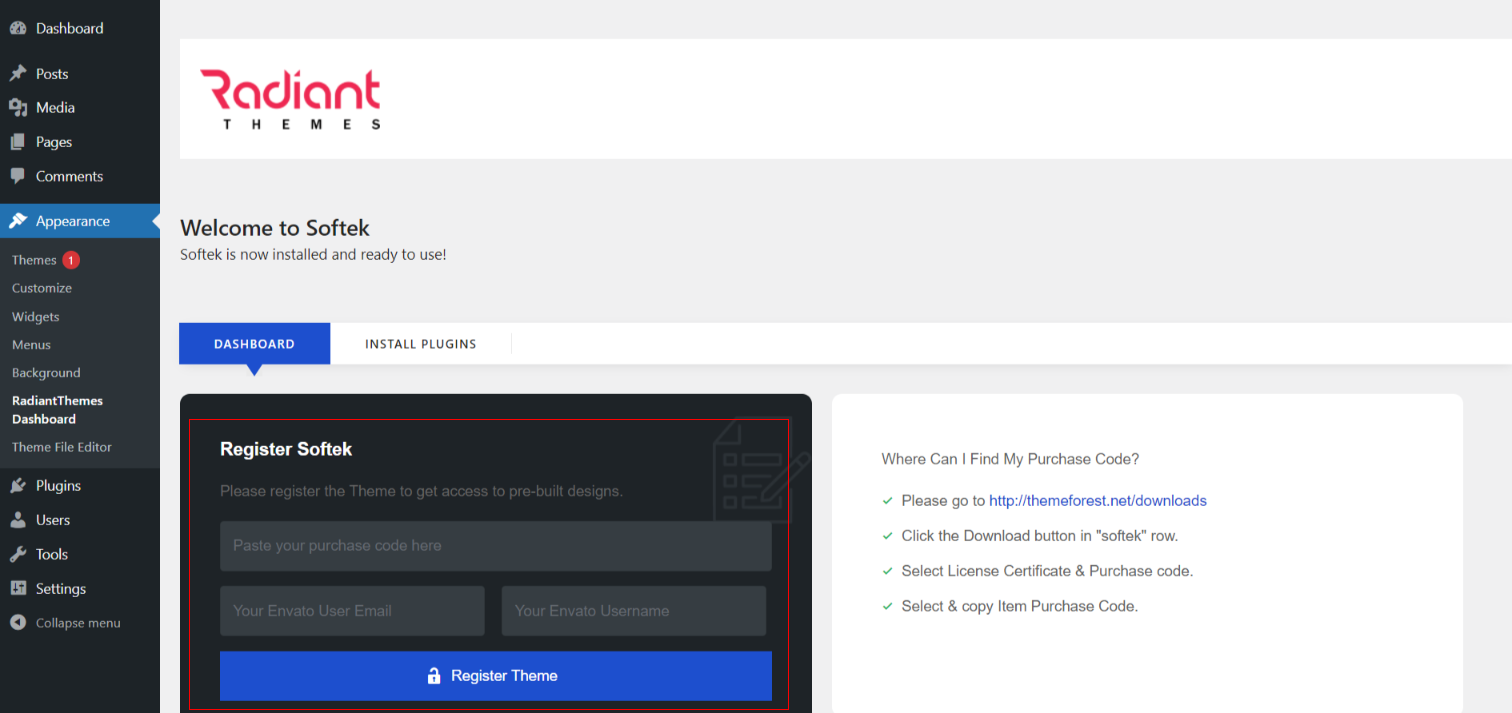
7) After the successfully registered, click on 'Click here to continue with Plugin install process' to install plugins.
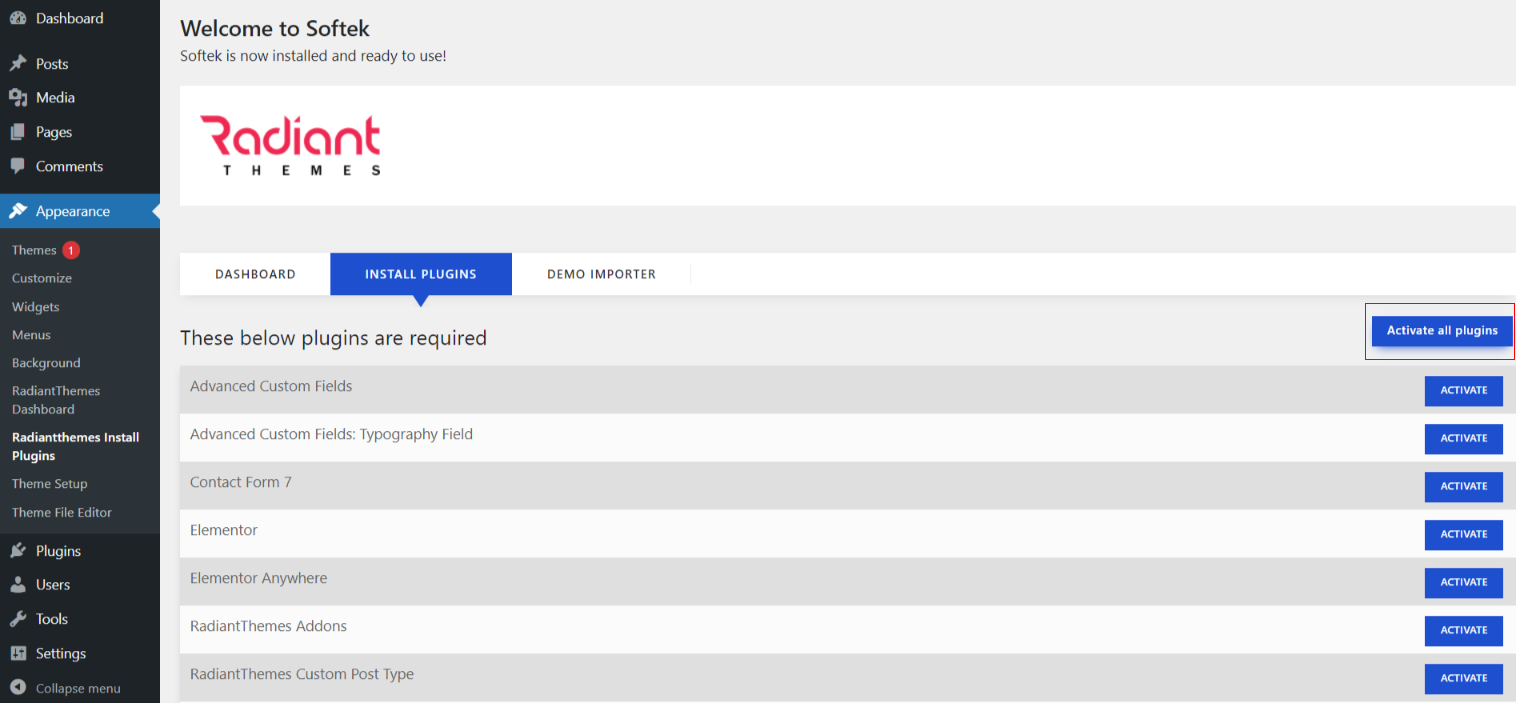
8) Click on 'Activate all plugins' to install and activate all plugins.
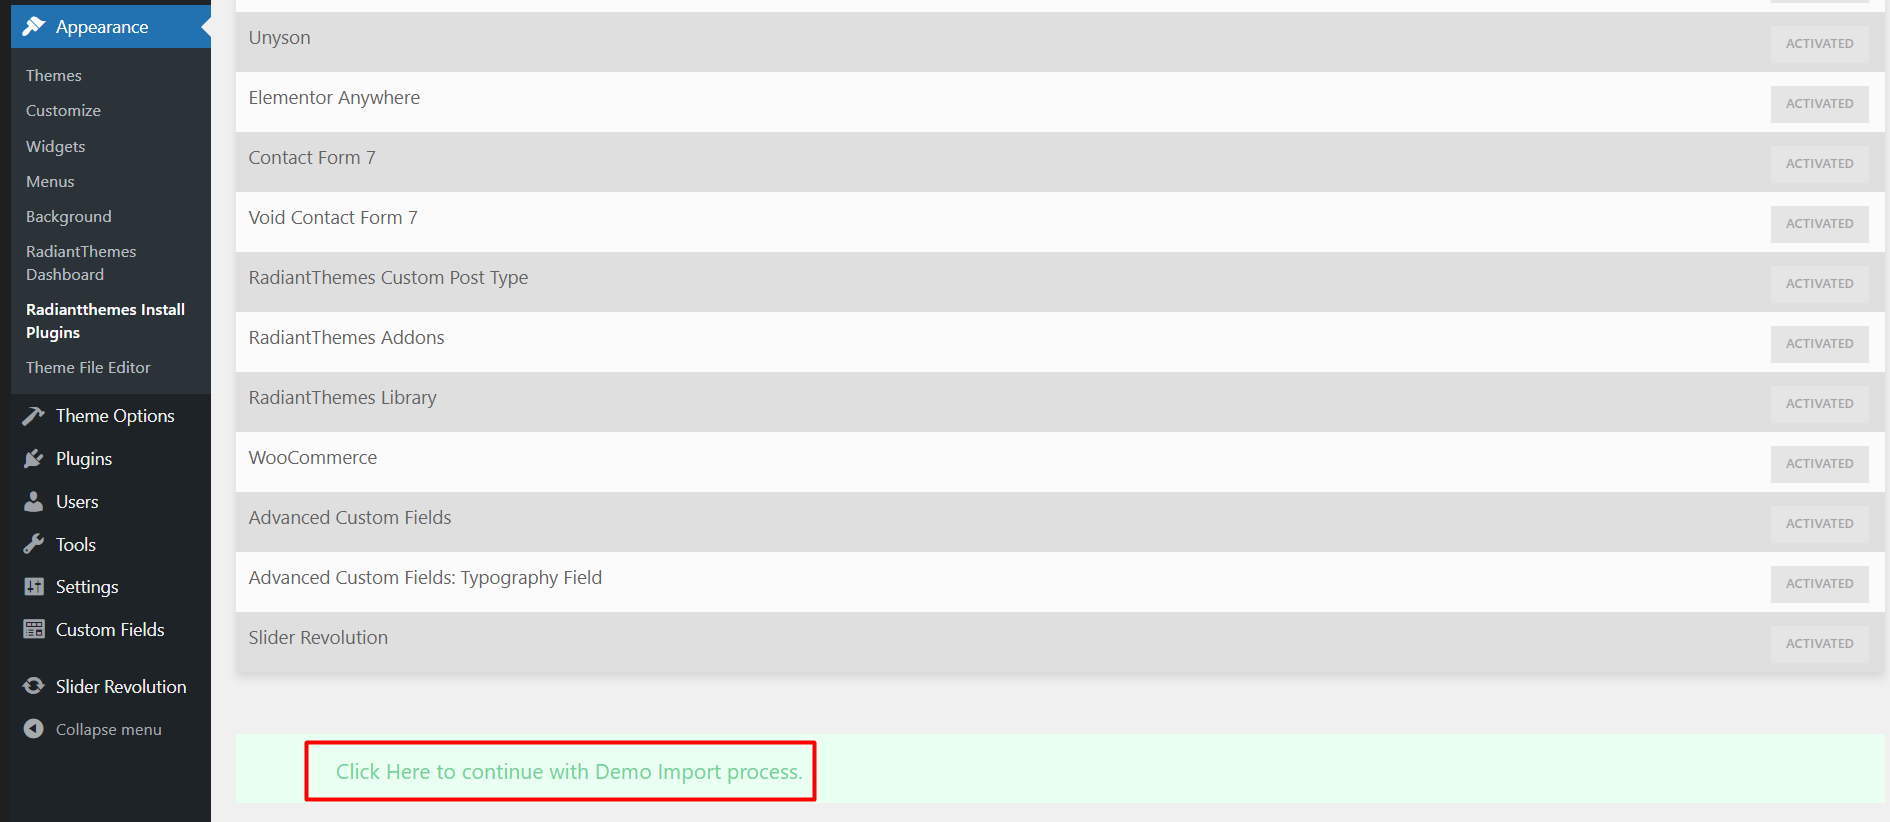
9) Click on 'Click Here to continue with Demo Import process' to import demo data.
10) Click on 'Import' to import demo data.

Now relax and import process will automatically finish and will show you progress on screen (via progress bar).
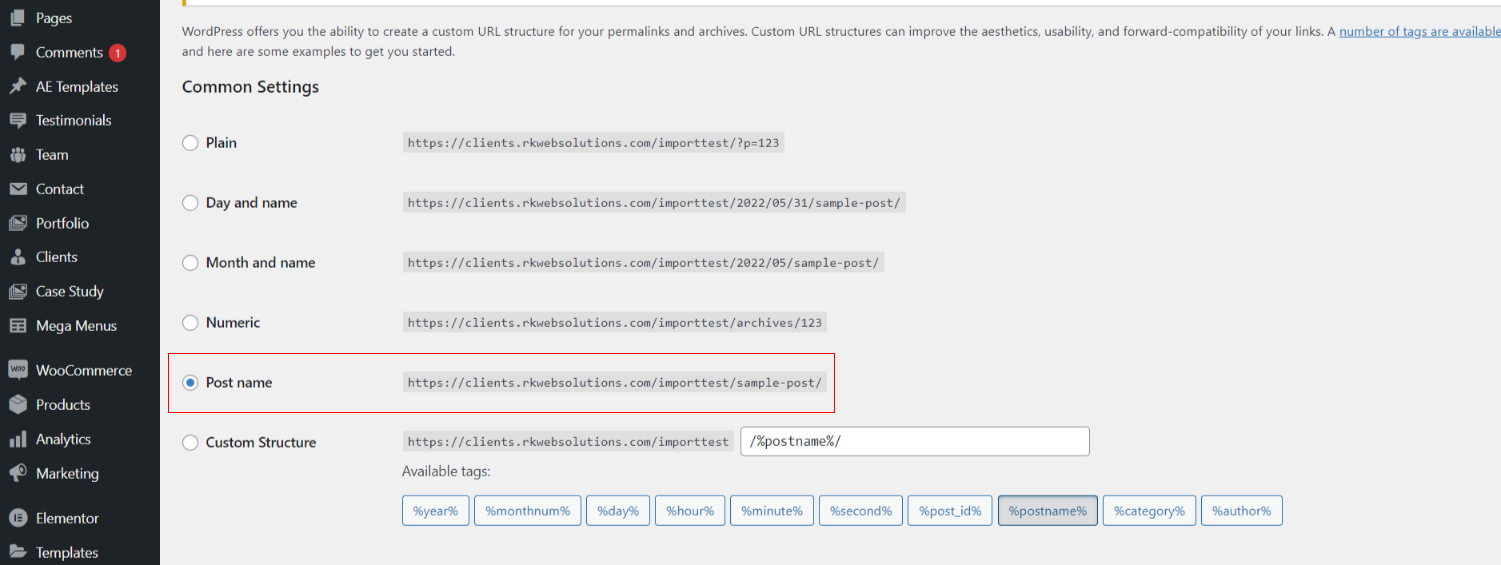
11) Now set the permalinks once.
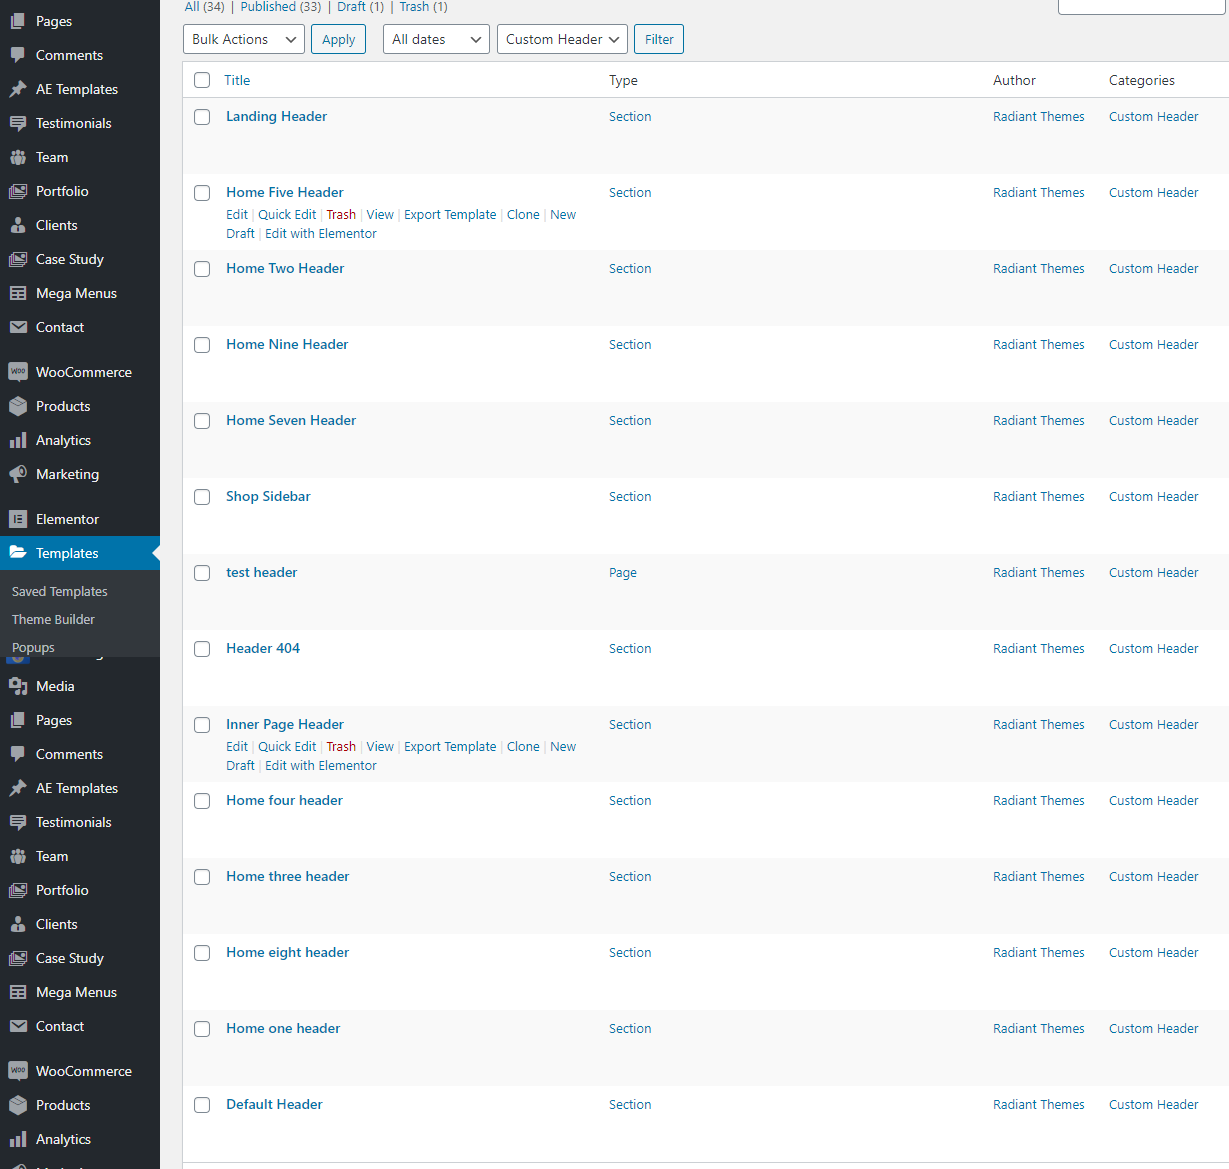
3. Header
Add/edit header
Header styles are coming through ‘Elementor’ and you can edit those styles from ‘Template > Saved Templates’.
Those templates which are assigned under 'Custom Header' are the templates of header. You can edit all those templates through ‘Elementor.
You can add new templates for header and sticky header from ‘Templates > Add New’ (Choose Section’ as template type, name your template and click on the ‘CREATE TEMPLATE button).
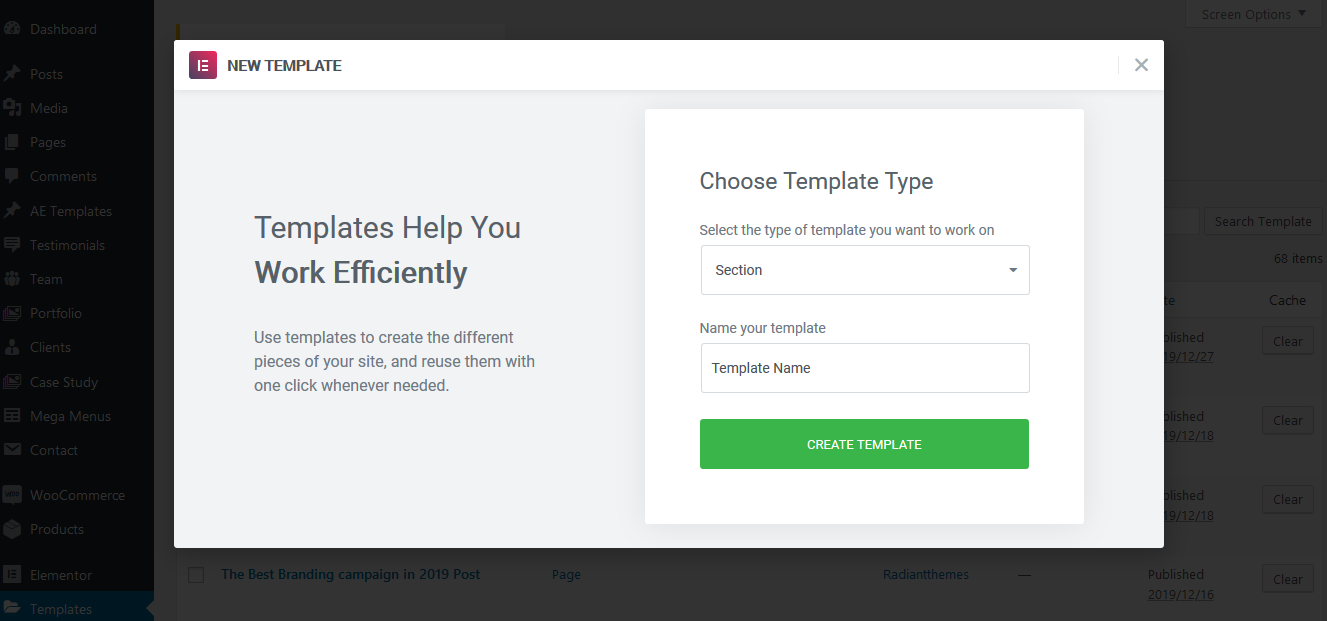
After creating the template, please choose the ‘Custom Header category for that template.

You can edit header by editing existing elements through ‘Elementor’. Also, you can add Logo, Menu, Cart Icon, Search or any other things on your new header by using our specific elements as per below:-
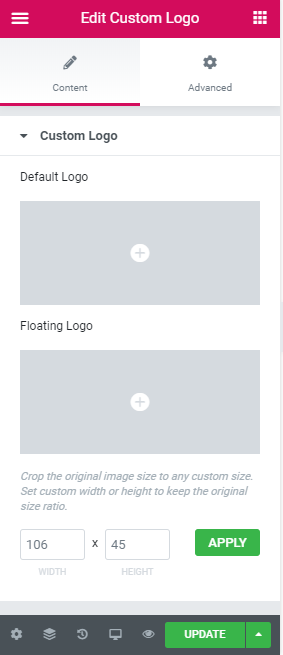
1) Logo:- You can add logo by using our ‘Custom Logo’ element. You can provide your logo image and height and width for the image from that element. You can change the logo for the sticky header from 'Floating Logo' field.
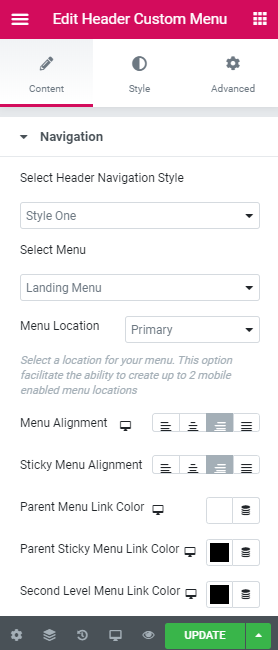
2) Menu:- At first, create menu from ‘Appearance > Menus. After that, You can add that menu on header by using our ‘Header Custom Menu’ element. You need to choose your already created menu (Which you’ve created from ‘Appearance > Menus’) on Select Menu’ field. Also, you can change color and other things for menu and sticky menu too from the element.
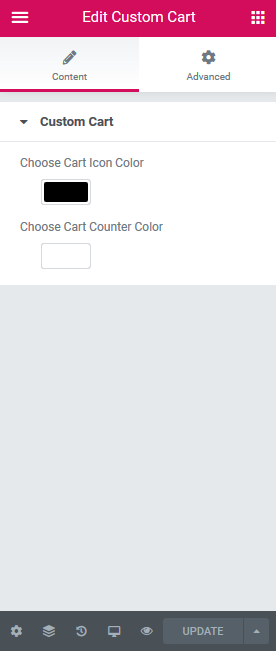
3) Cart Icon:- You can add cart icon by using our ‘Custom Cart’ element. You can provide ‘Cart Icon Color’ and ‘Cart Counter Color’ from the element too.
4) Search:- You can add search by using our ‘Custom Search’ element. You can provide search icon color from the element too.

Setup header
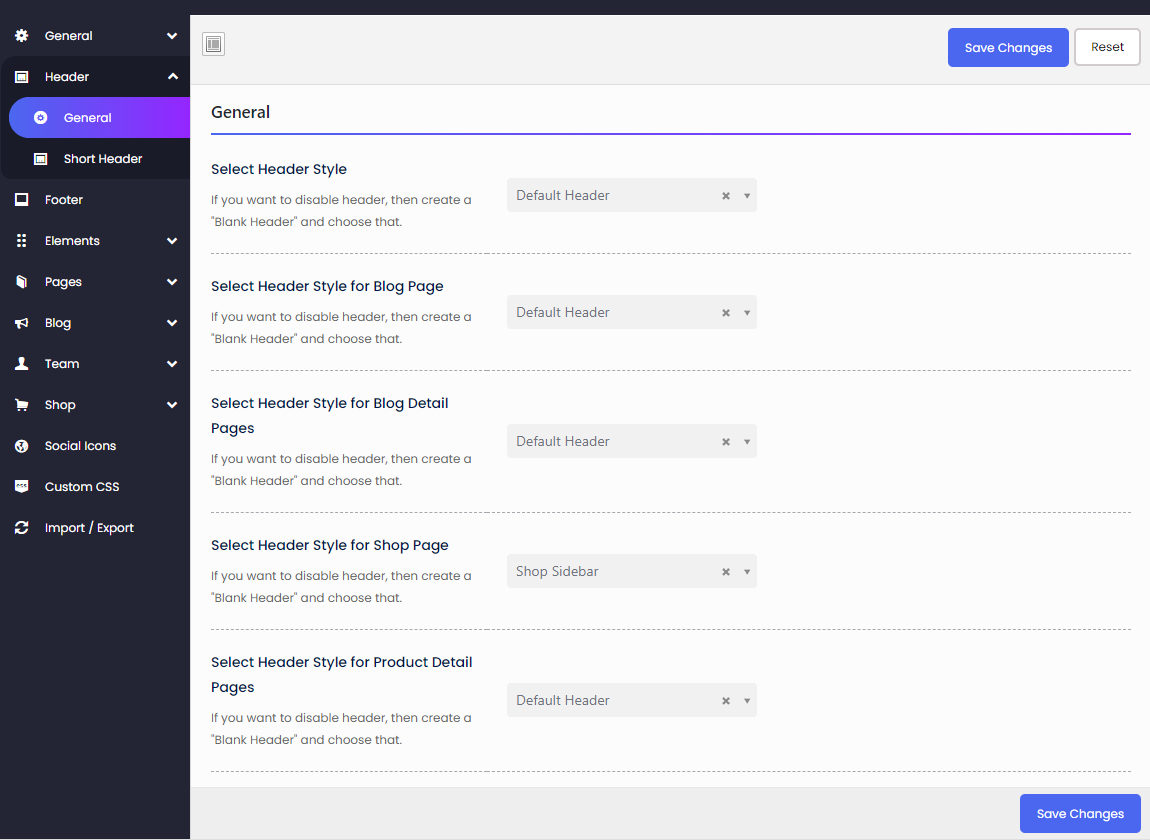
If you want to run a common header for all pages, then choose any header style as per your choice from ‘Theme Options > Header > General > Select Header Style’.
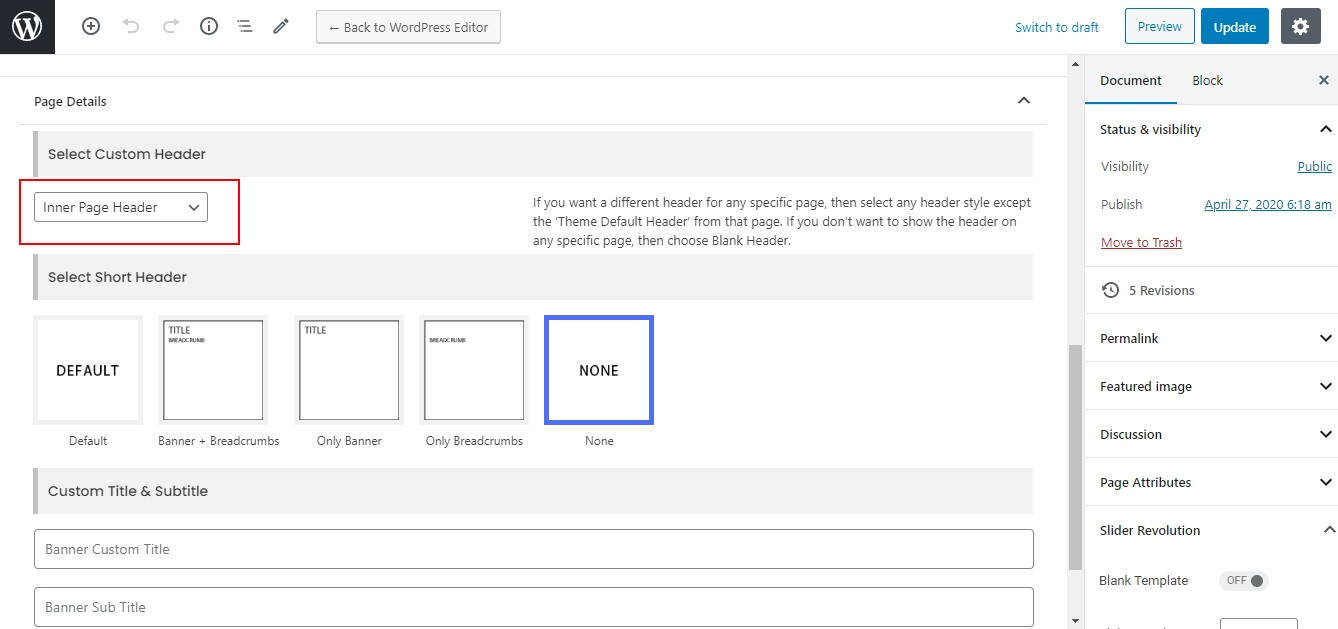
Different header on individual pages:- If you want a different header for any specific page, then choose any header style from that page from the ‘Select Custom Header’ section except the ‘Theme Default Header’. ‘Theme Default Header’ is the current header style of ‘Theme Options > Header > General > Select Header Style’ which is common for all pages.
For example, if you select ‘Header Seven’ from Theme Options > Header > General > Select Header Style’ and Theme Default Header from any specific page, then ‘Header Seven’ will run on that page. So, if you want a different header for any specific page, then select any header style except the ‘Theme Default Header’ from that page.
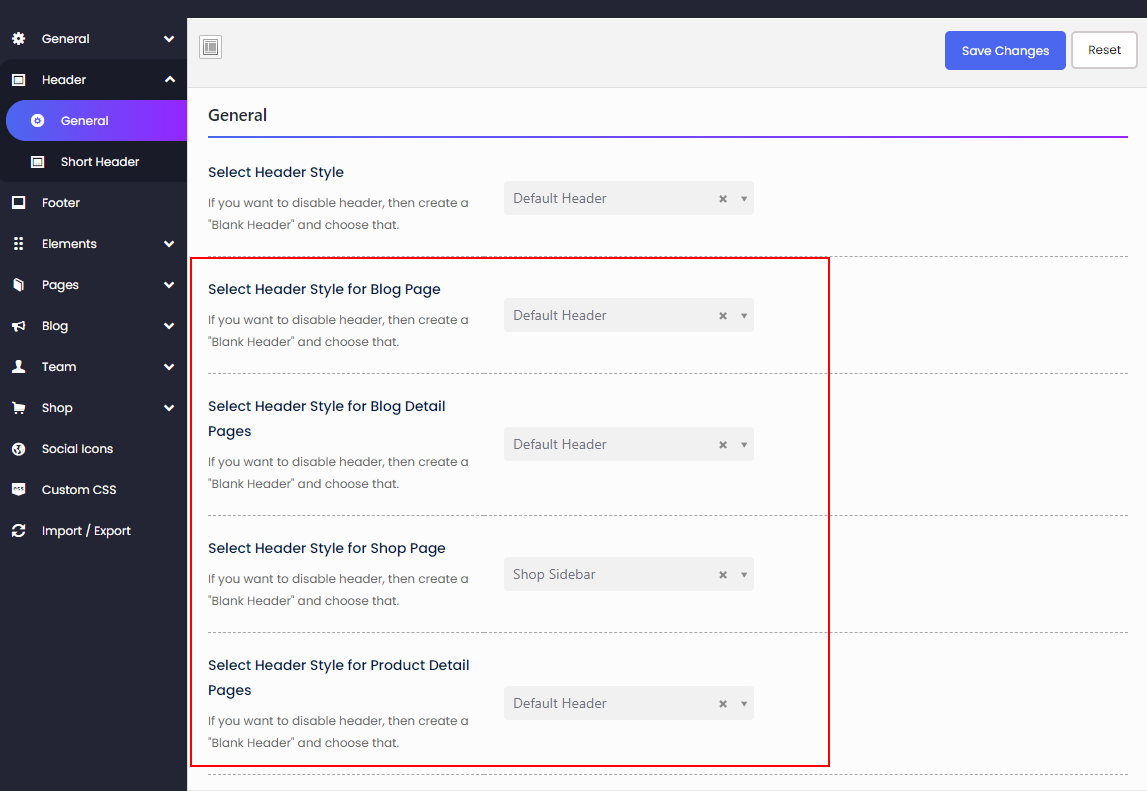
As layout for 'Blog' and 'Shop' pages are managing from Theme Options only, so you won't be able to edit those pages through 'Elementor' and can't choose individual header for them from page level. You can choose individual header for them from ‘Theme Options > Header > General’.
4. Footer
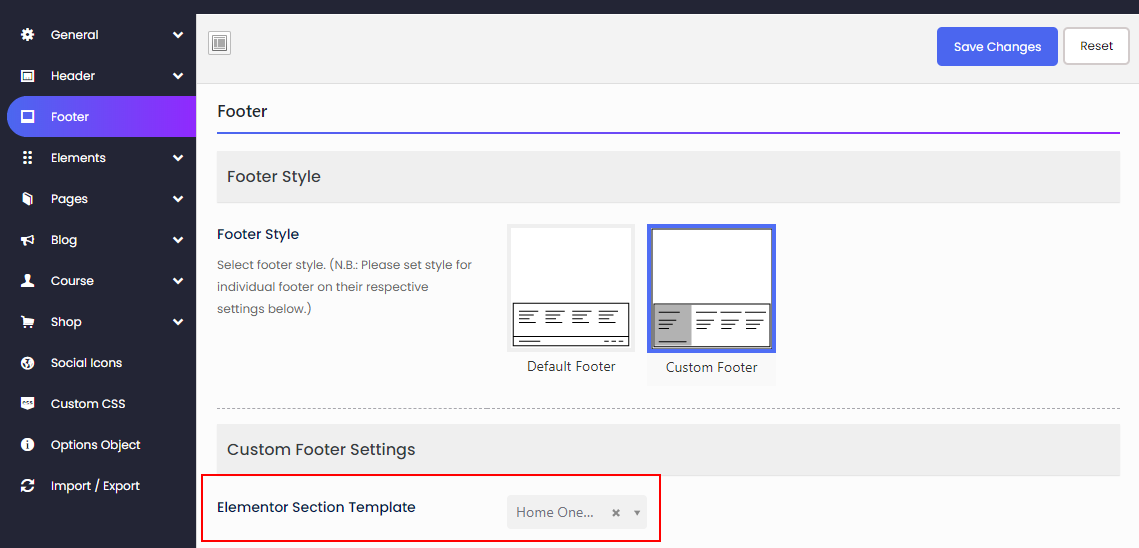
Setup Footer
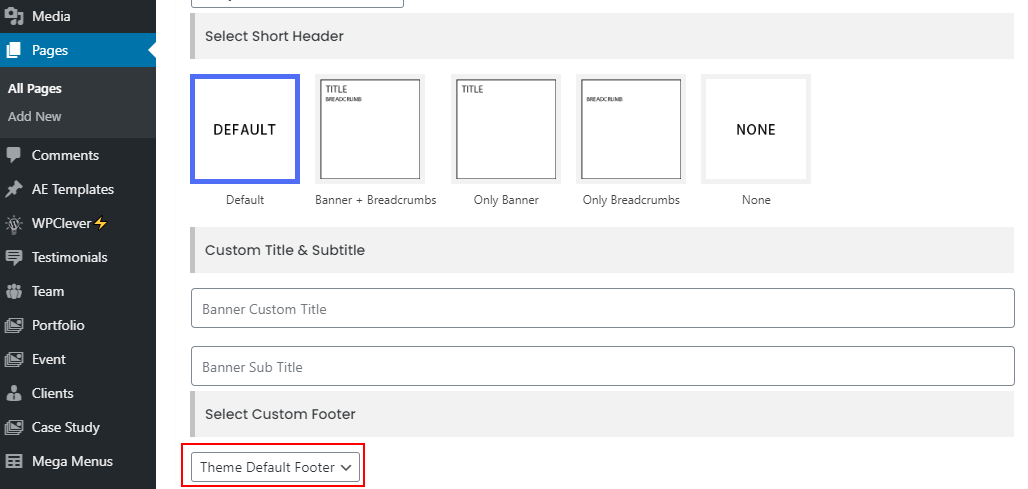
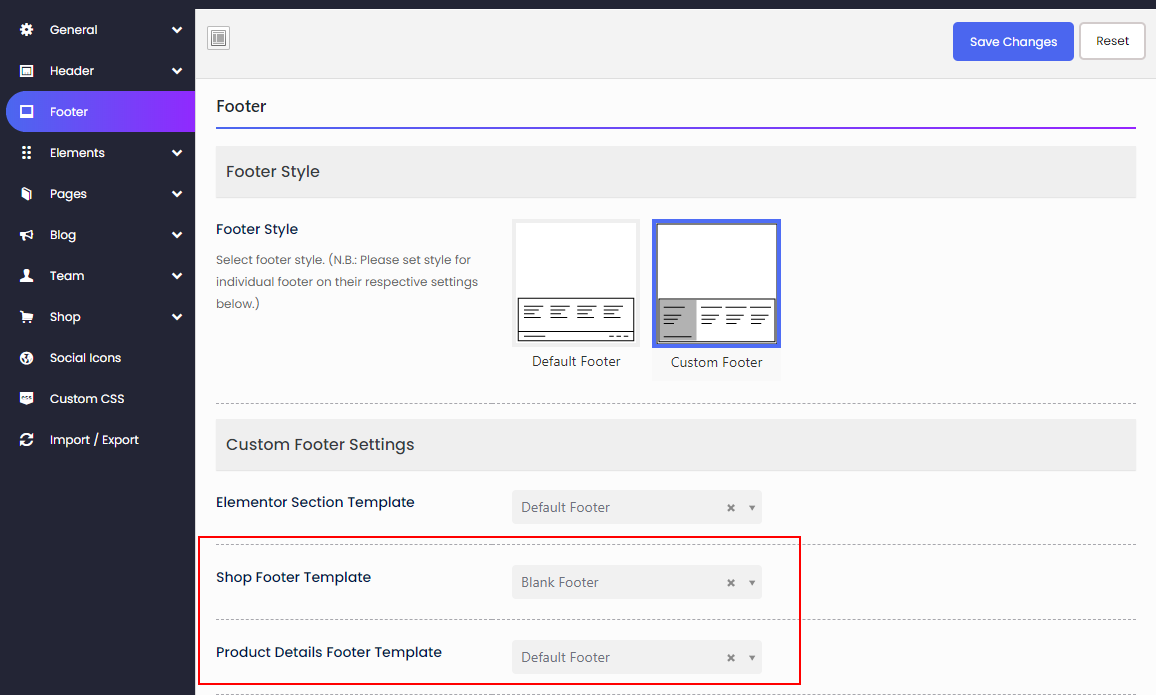
You can choose footer style from 'Theme Options > Footer > Custom Footer Settings' as per below screenshot:-
Figure -1
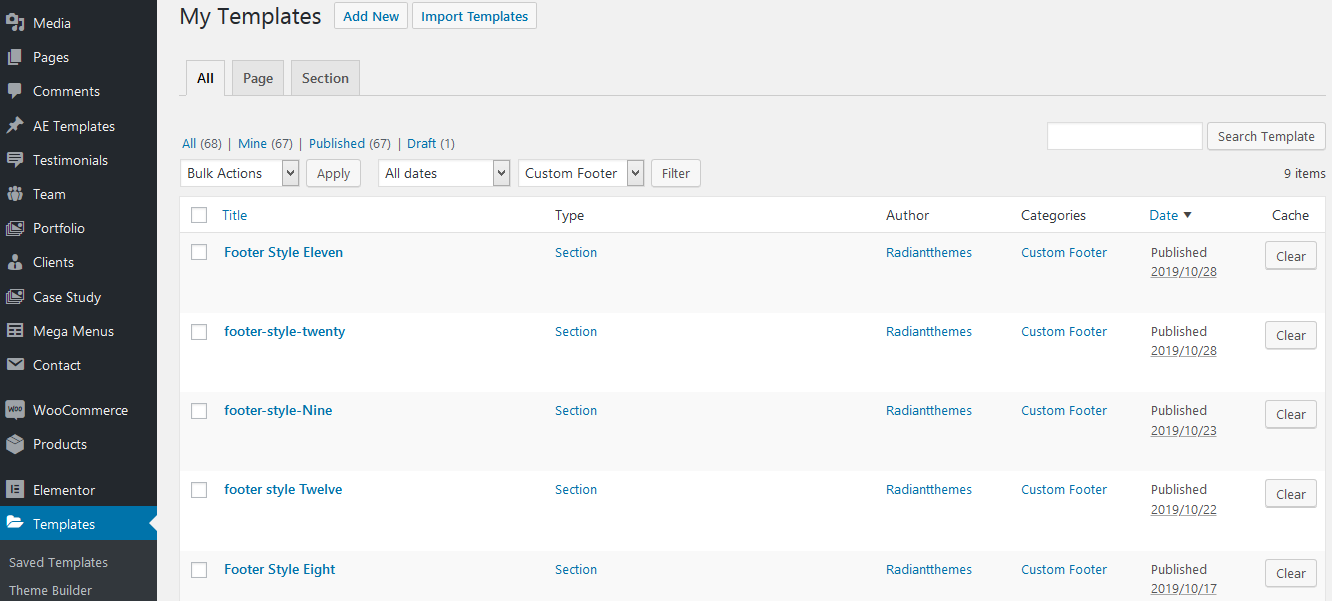
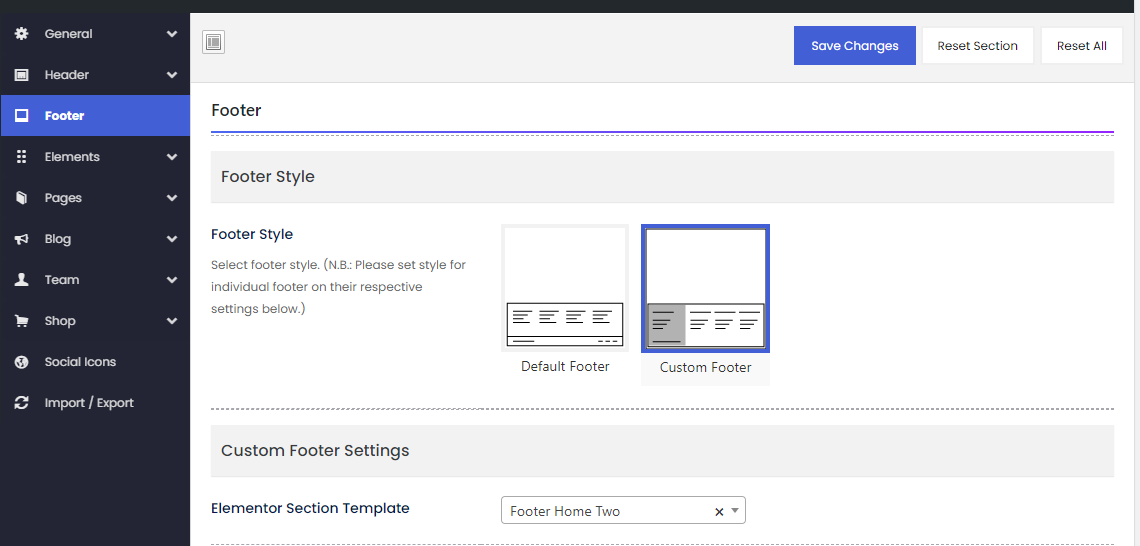
'Custom Footer' styles are coming from 'Template > Saved Templates' (See below screenshot:-Figure -2) You can edit those through 'Elementor'.
Figure -2
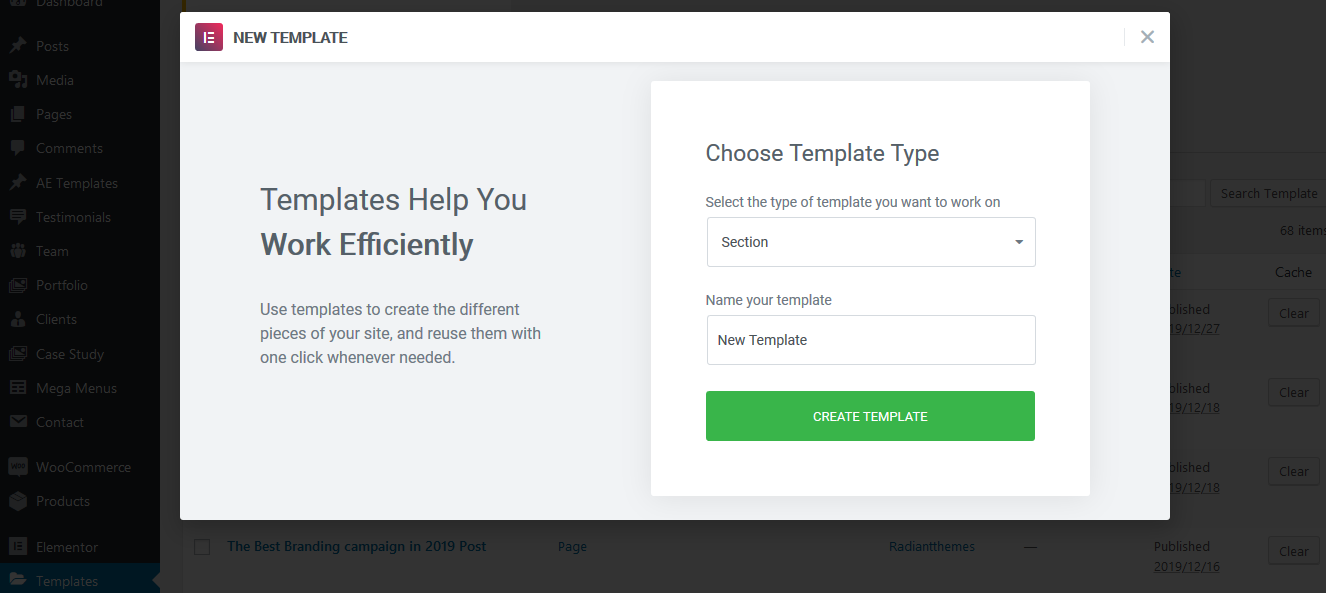
You can create new template from ‘Templates > Add New (Choose ‘Section’ as template type, name your template and click on ‘CREATE TEMPLATE’ button).
Figure -3
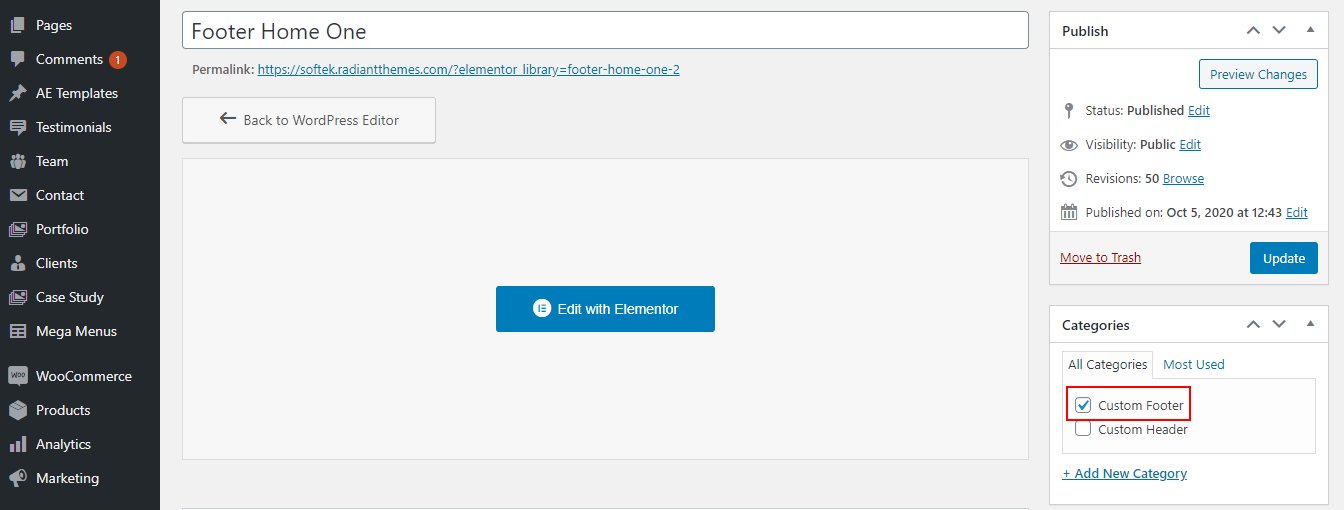
After creating the template, assign the template under 'Custom Footer' category (Check Figure -4). Once you'll create a new style, that style will be automatically added on 'Theme Options > Footer > Custom Footer Settings > Custom Footer' (Check Figure -4).
Figure -4
To get the common footer for all pages, make sure that 'Theme Default Footer' option is selected for 'Select Custom Footer' section on all pages.
Figure -5
Setup different footer for a page
By-default, footer functions from Theme Options -> Footer for all pages.
Figure -1
In above example, Footer Style Two was selected. This means Style Two footer would appear on ALL PAGES of your site.
Now, sometimes we receive requests from buyers where they want to show different footer style (for menu or appearance) for different pages. So we have come up with this option where you can display a different footer style for a particular page.
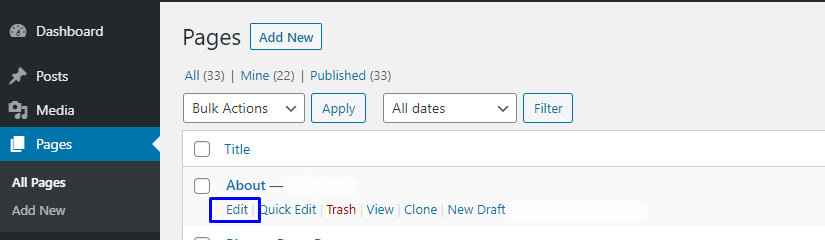
For example, if you want to display a different footer style for about page then go to Pages -> Select a page ->Edit . In below example about page was chosen.
Figure -2
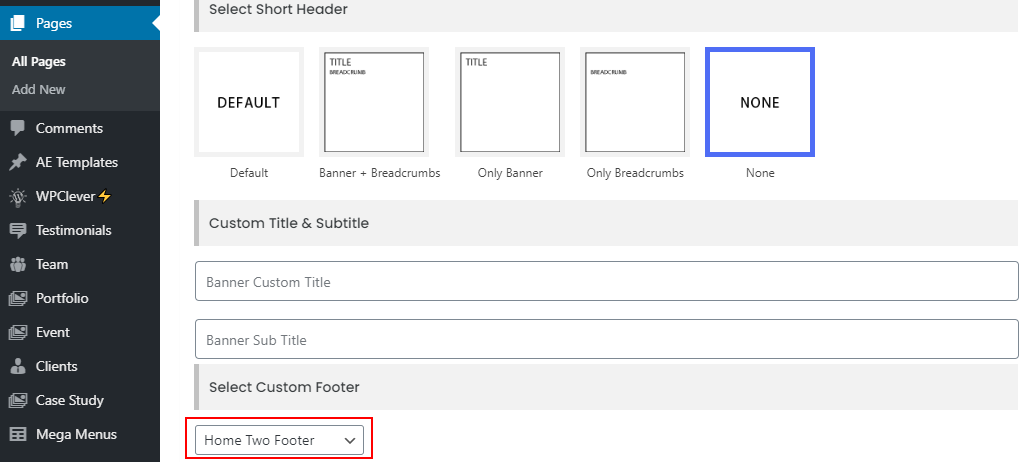
On next screen, scroll down a bit and you'll see a section to choose footer styles. Refer to the screenshot below. You can now select any footer type and save the page. Now, you have a new footer style for your about page. You can do same for other pages also.
You can edit footer style from 'Templates > Specific Template'.
As layout for 'Shop' page is managing from Theme Options only, so you won't be able to edit that page through 'Elementor' and can't choose individual footer for that page from page level. You can choose individual footer for that page from ‘Theme Options > Header > General’.
5. Pages
You can add a new page from 'Pages > Add New'. You need to choose template of the page from 'Page Attributes' section on the right side of the screen.
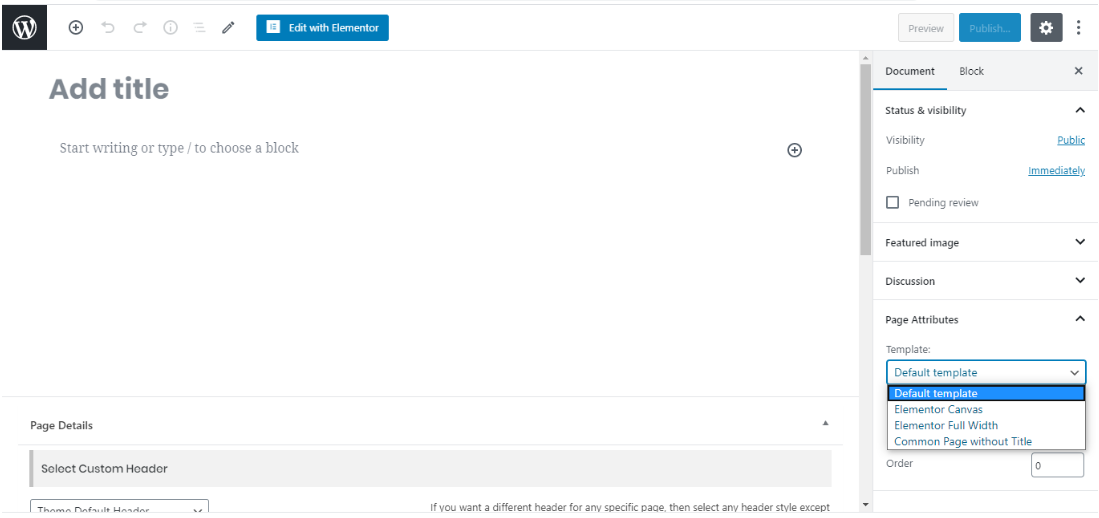
You need to choose 'Elementor Full Width' template for all the pages except the shop related pages (i.e; 'Shop', 'Cart', 'Checkout' and 'My account' pages). For shop related pages, you need to choose 'Common page Without Title' template.
6. Blog
Please go through the points given below to understand how to create a new blog post–
1) Login to WordPress admin panel.
2) Navigate to “Posts > Add New.
3) Provide a suitable title for your blog post.
4) Provide content.
5) As short contents for blog post element are coming from ‘Excerpt’, so you need to provide content on Excerpt’ too.
6) Provide featured image.
7) From “Categories” box, you can put your blog post under a suitable category or create a new category for that.
8) Finally, click on “Publish” button to publish your blog post.

7. Team
Please go through the points given below to understand how to create a new team item—
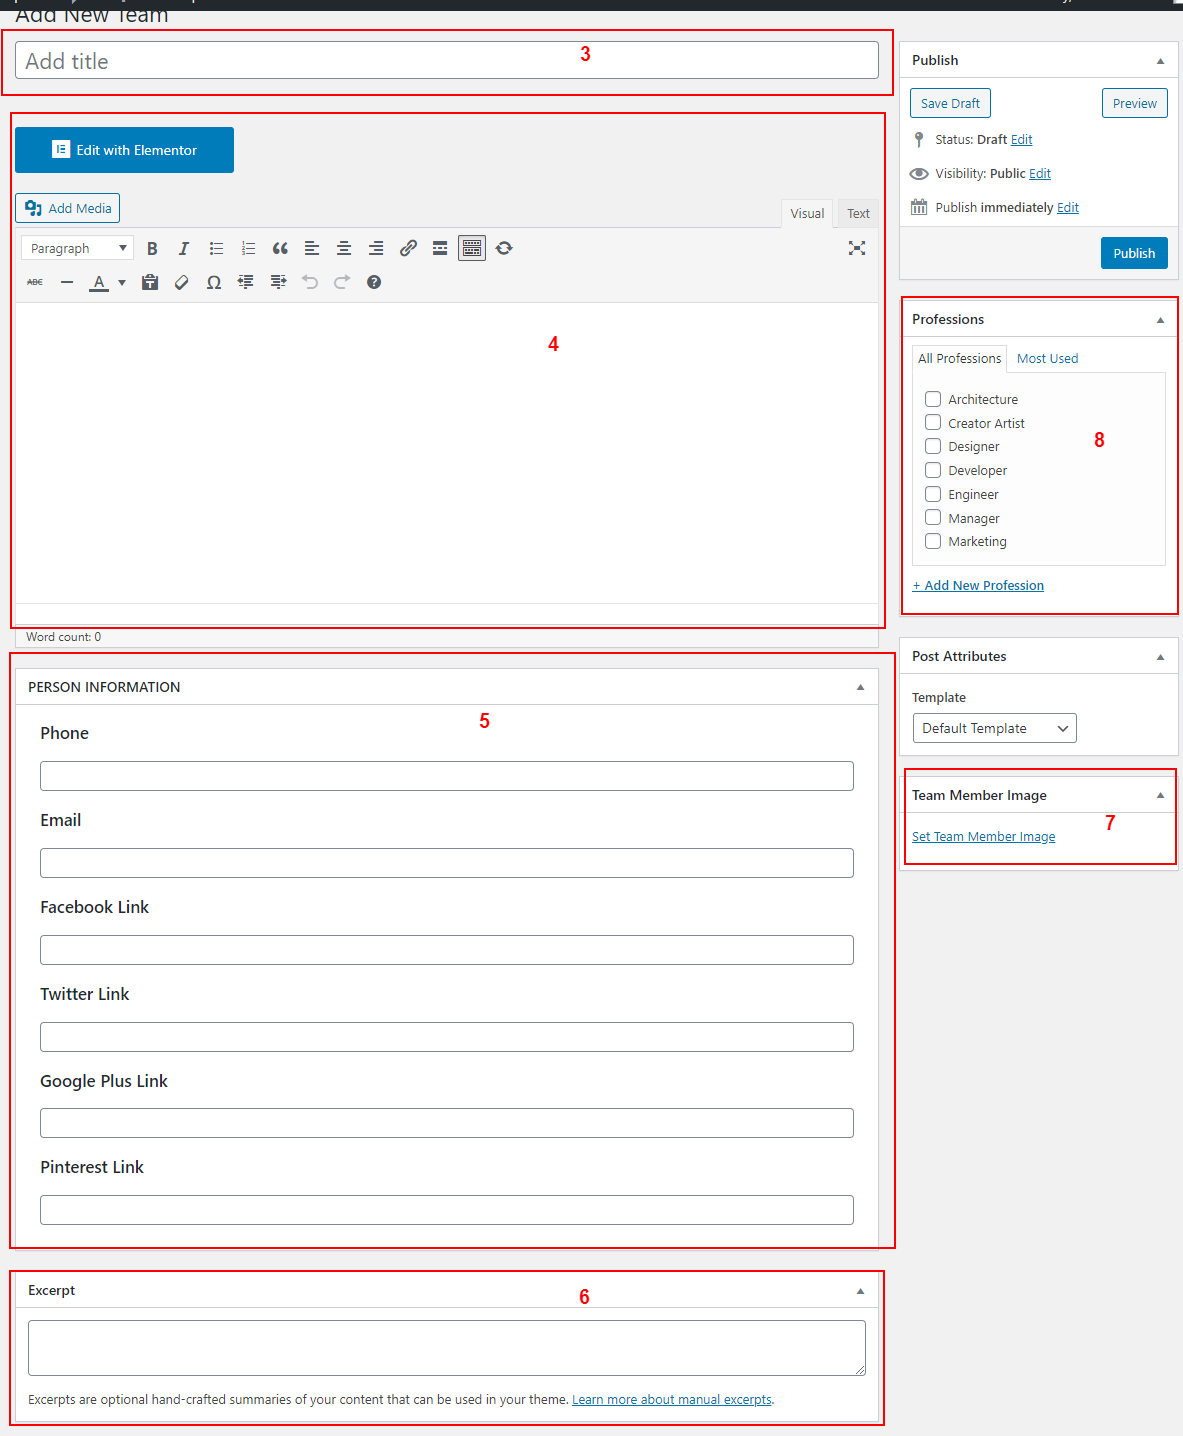
1) Login to WordPress admin panel.
2) Navigate to “Team > Add New Team”.
3) Provide a suitable title for your team item.
4) Provide content.
5) Provide person information from 'Person Information' box
6) As short contents for team element are coming from ‘Excerpt’, so you need to provide content on ‘Excerpt too.
7) Provide Team Member Image.
8) From “Professions” box, you can put your team item under a suitable profession or create a new profession for that.
9) Finally, click on “Publish” button to publish your team item.
8. Portfolio
Please go through the points given below to understand how to create a new portfolio post—
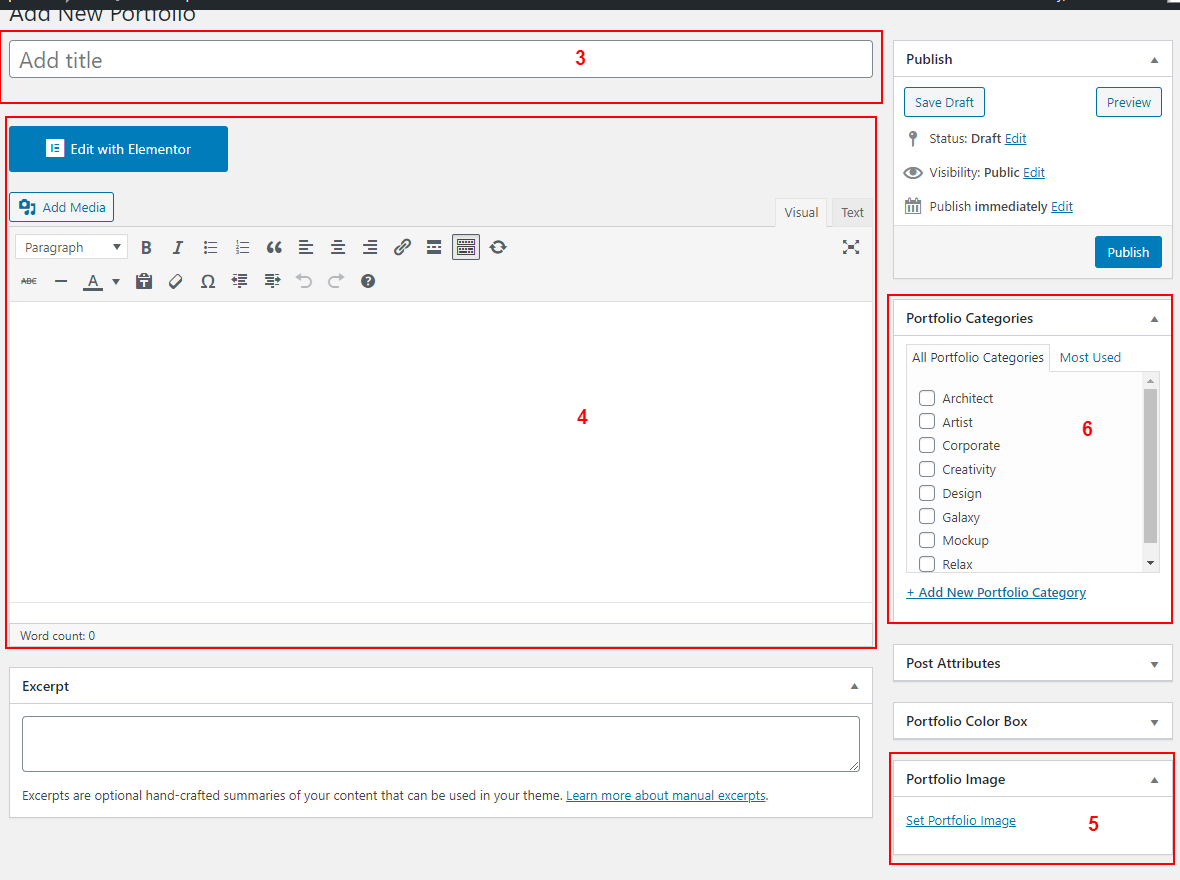
1) Login to WordPress admin panel.
2) Navigate to “Portfolio > Add New Portfolio”.
3) Provide a suitable title for your portfolio item.
4) Provide content.
5) Provide portfolio image.
6) From “Portfolio Categories” box, you can put your portfolio item under a suitable category or create a new category for that.
7) Finally, click on Publish” button to publish your portfolio item.
9. Clients
Please go through the points given below to understand how to create a new client item—
1) Login to WordPress admin panel.
2) Navigate to Clients > Add New Client”.
3) Provide a suitable title for your client item.
4) Provide client image on featured image section.
5) Finally, click on “Publish” button to publish your client item.

10. Testimonial
Please go through the points given below to understand how to create a new testimonial item—
1) Login to WordPress admin panel.
2) Navigate to “Testimonials > Add New Testimonial”
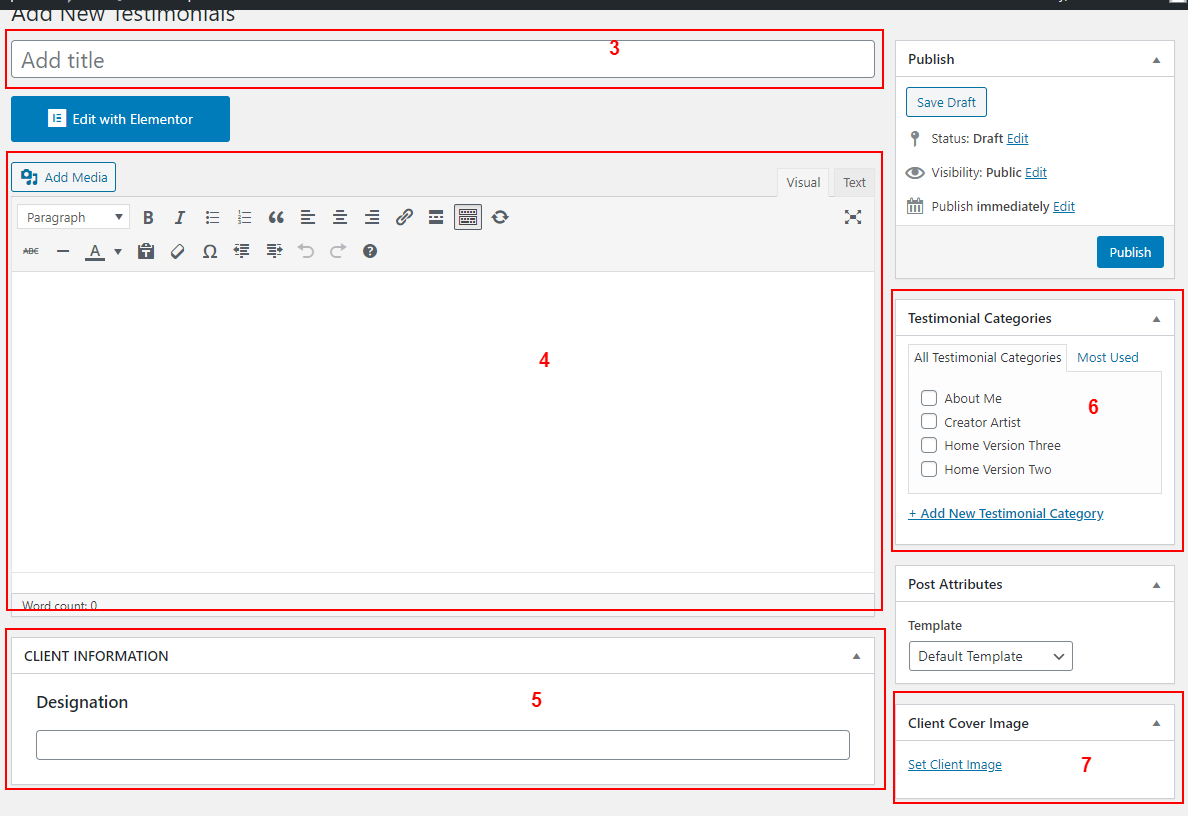
3) Provide a suitable title for your testimonial item.
4) Provide content.
5) Provide 'Designation'.
6) Provide testimonial category.
7) Provide testimonial image.
8) Finally, click on Publish” button to publish your testimonial item.
11. WooCommerce
Install WooCommerce and setup default shop pages
If your site doesn’t have WooCommerce installed already, then you need to install the WooCommerce plugin first. To do the same, navigate to ‘Plugins’ > ‘Add new and then type ‘WooCommerce into the search field. Now install the plugin by clicking on Install Now” button. After that, click on “Activate” button to activate the plugin. After activating, you will get notification to install WooCommerce pages. So, install default WooCommerce pages from there. To get more information about WooCommerce, click on this link– WooCommerce Documentation
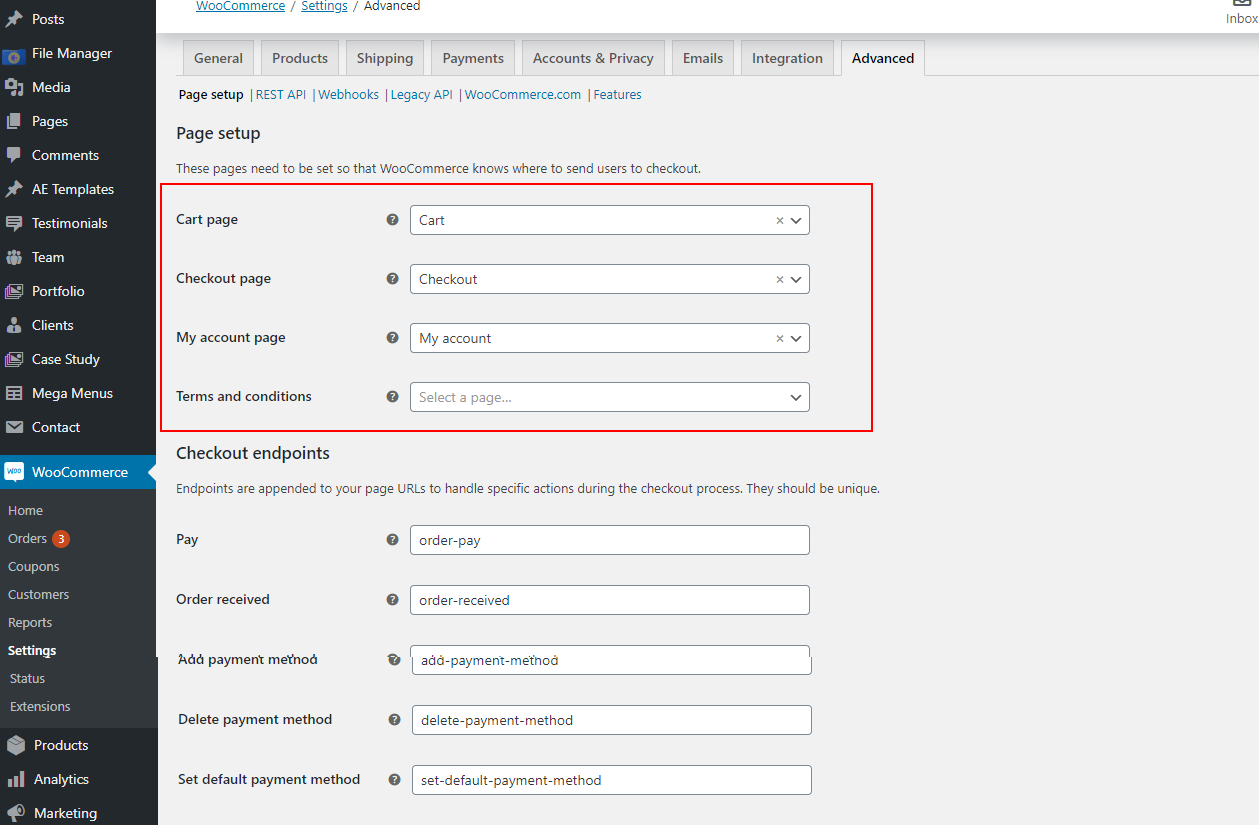
Assign Shop related pages
You need to assign all shop related pages from 'WooCommerce > Settings > Advanced' as per below screenshot:-
Manage 'Shop' page layout
As layout of 'Shop' page is managing from 'Theme Options', so you won't be able to edit them through 'Elementor'. You can manage 'Shop' page layout from 'Theme Options > Shop > Product Listing'.
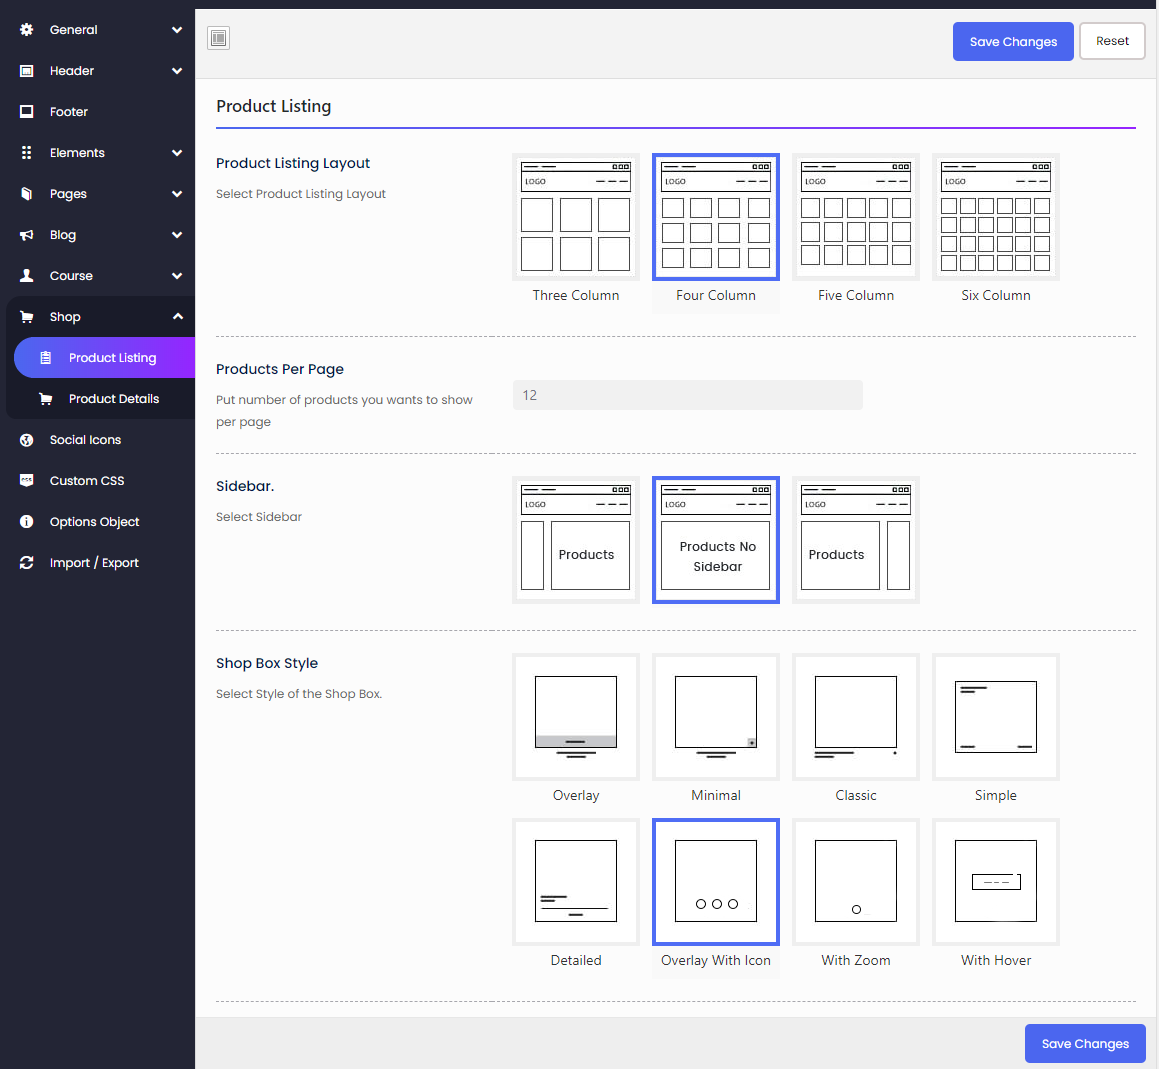
1) Product Listing Layout: You can select how many columns of products you want to show on a single row from this field.
2) Products Per Page: Put number of products you wants to show per page.
3) Sidebar: Selct if you want left or right sidebar on your 'Shop' page. If you don't want sidebar, then choose 'Products No Sidebar'.
4) Shop Box Style: Choose the style of the shop boxes.
Manage product details pages layout
You can manage product details pages layout from 'Theme Options > Shop > Product Details'.
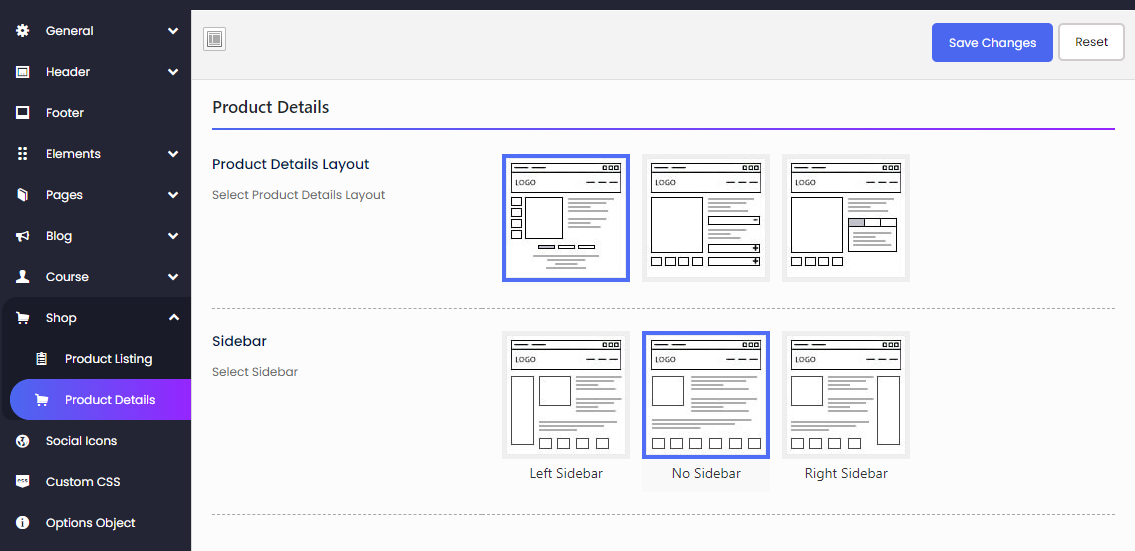
1) Product Details Layout: Select product details pages Layout
2) Sidebar: Selct if you want left or right sidebar on your product details pages. If you don't want sidebar, then choose 'No Sidebar'.
Mange important WooCommerce Options
Please follow below tutorial to manage specific WooCommerce options:-
Managing Products: https://docs.woocommerce.com/document/managing-products/
Managing Orders: https://docs.woocommerce.com/document/managing-orders/
Managing Email Templates: https://woocommerce.com/posts/how-to-customize-emails-in-woocommerce/
12. Contact Form 7
Contact form 7 is used to create ‘easy to handle’ and ‘easy to customize’ forms. This theme has seven pre-built forms. To get all forms, ‘Contact Form 7’ plugin must be installed and activated. You can add/edit/delete the contact form by following this documentation— https://contactform7.com/getting-started-with-contact-form-7/
13. Theme update
Download the latest package of the theme, unpack the files, and upload the theme on the server.
You need to upload the theme on your server by following these steps–
1) Login to your Hosting
2) Go to public_html > wp-content > themes
3) Upload the updated zip file of your theme
4) Delete the theme of the present version
5) unzip the updated version of the theme
6) After unzip, you may delete the theme zip
14. Plugin update
You can update plugins by following below steps–
1) Login to your wp-admin
2) Go to Plugins > Installed Plugins
3) Now, delete those plugins which you want to update.
4) Now, go to Appearance > Radiantthemes Install Plugins’ and re-install and re-activate those plugins again and you'll get the updated plugins.
15. Change slug of custom post type
You can change the slug of existing custom post types from 'Theme Options > General > Custom Slug'.
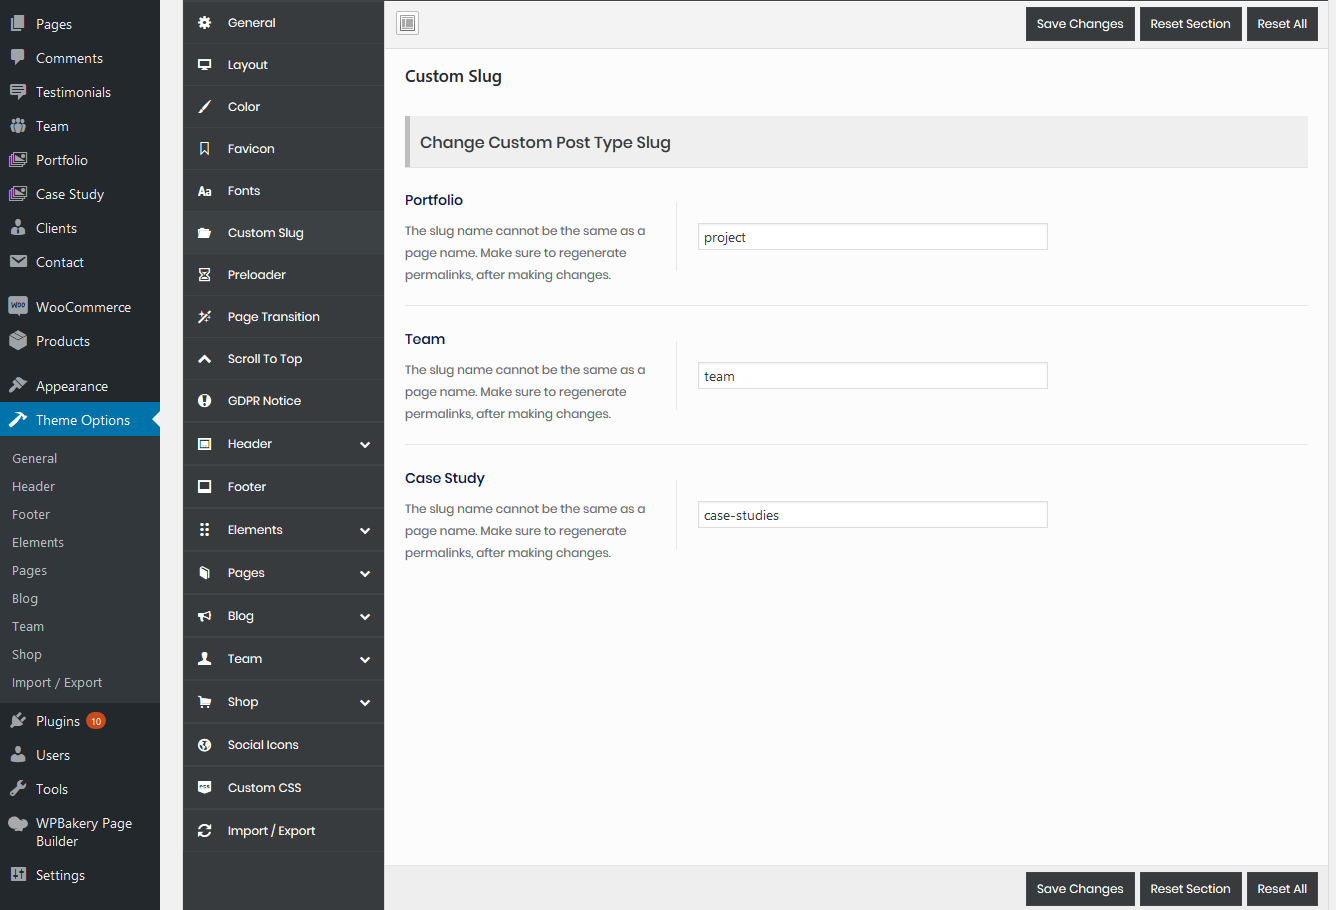
After changing the slug, please set the permalink once from 'Settings > Permalinks'.
16. Template Library
You can use maximum of our sections of any page on another pages by using our template library.
You can use template library by following below steps–
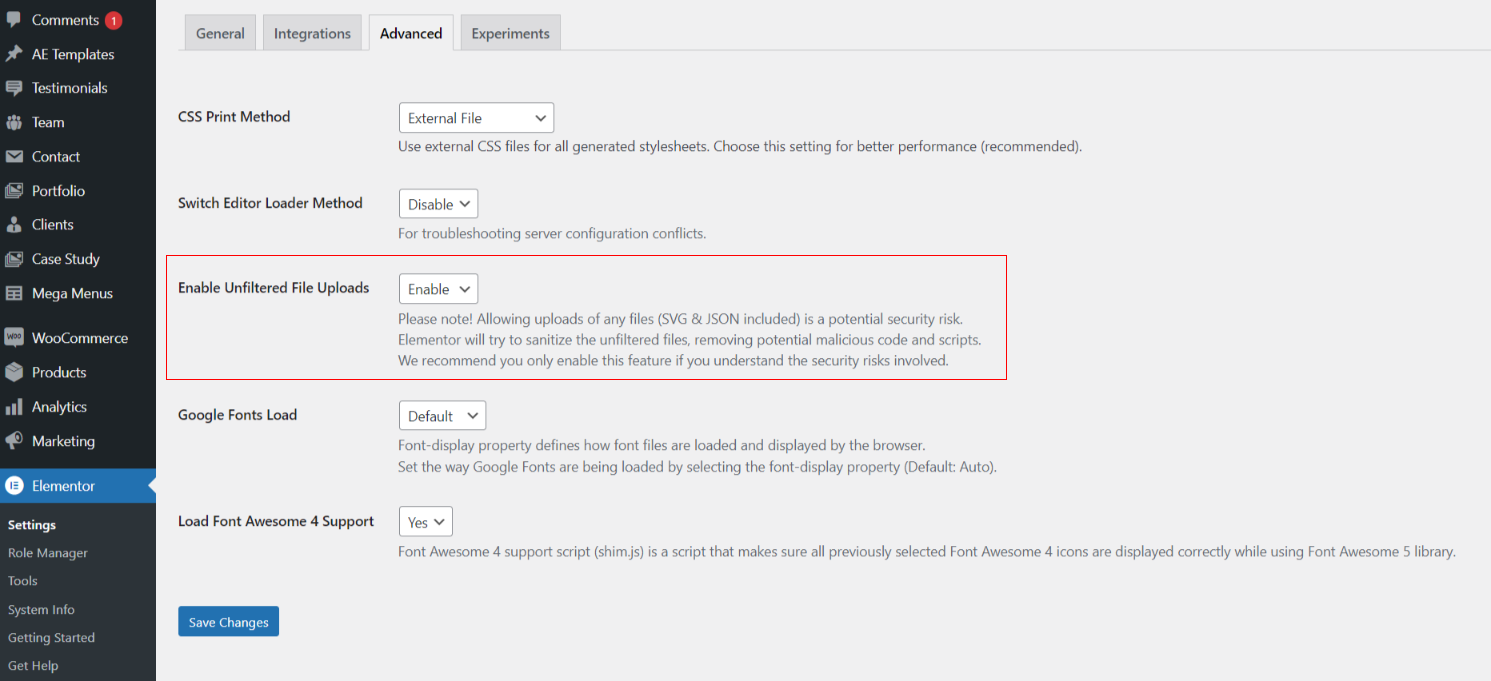
Point to note: Make sure you've enabled the below option from 'Elementor > Settings > Advanced' so that image can be shown.
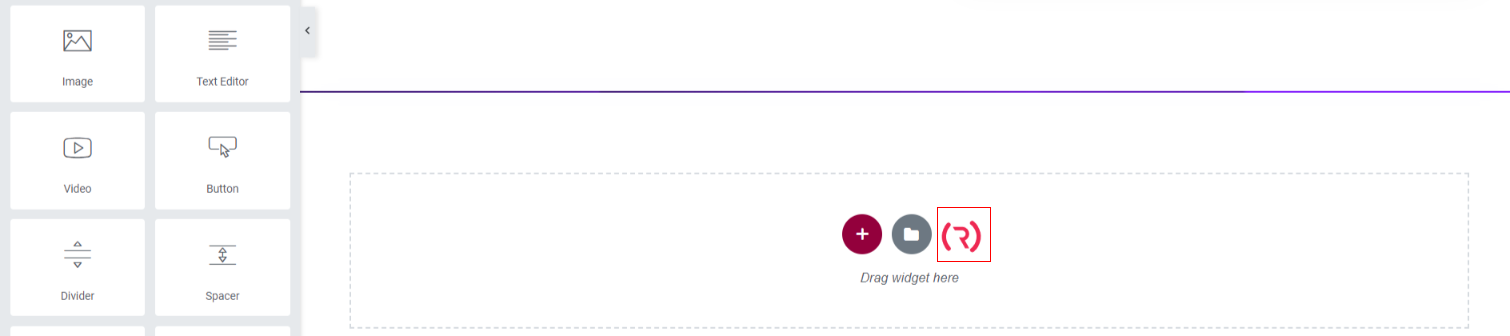
1) Go to that page where you want to have the section and click on the highlighted section of below screenshot.
2) Click on refresh to get all of our latest sections (Make sure you've not used the same purchase code on any other domain).
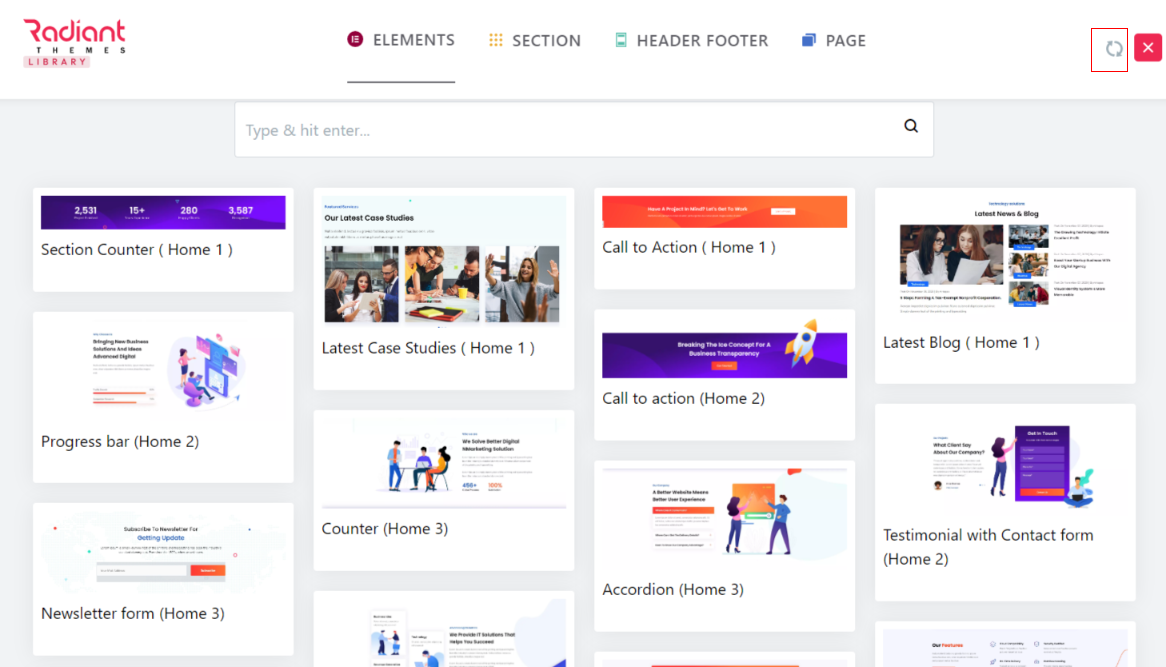
3) Now go to that section which you want to import and click on 'Insert'.
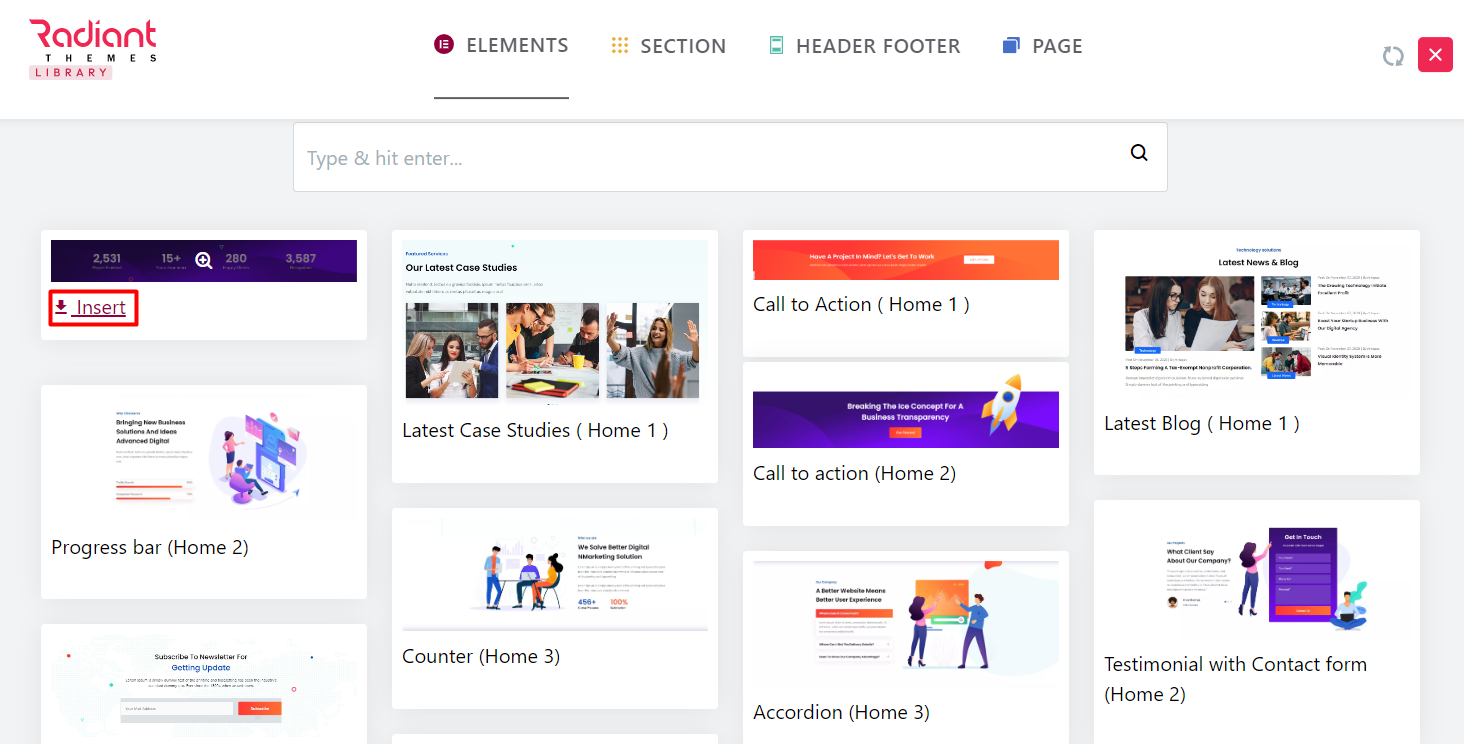
4) Once you'll import section, that secton will be added on that page.